|
|
|
installing flooring without a flooring nailer
Thursday, November 8 2012
I began work today on the task of installing a hardwood floor in the greenhouse second floor. I'd bought $200 worth of White Oak flooring from Home Depot, though I hadn't rented a flooring nailer. I figured the floor would be small enough for me to install the flooring just using a hammer, a nail set, a box of two inch finishing nails, and an improvised system for forcing the boards together before nailing them. First, of course, I had to thoroughly clean the floor and lay down a plastic vapor barrier. There is also a vapor barrier between the floor joists and the Wonderboard of the greenhouse downstair's ceiling, meaning that moisture will not be able to enter the joist space between the levels from either direction.
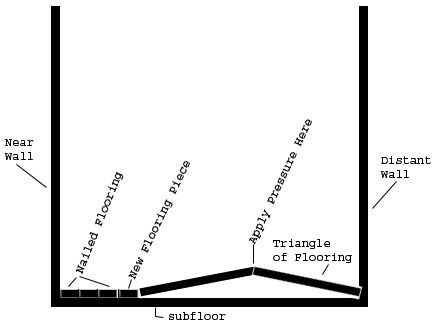
Installing flooring without a flooring nailer is slow but steady. And forcing the boards together isn't difficult in a space as narrow as the greenhouse upstairs. My technique was to arrange two pieces of flooring orthogonal to the row of flooring I was installing, forcing one end of one piece against the flooring being installed, the other end of the other piece against the distant wall, and the ends of the two boards together wherever they happened to meet above the floor. Ideally the lengths would be such that the two boards would form a low triangle above the floor, a system that would force the flooring being installed snugly in place when pressure was applied to the peak of the triangle. The lower the triangle, the greater the leverage (though the less distance over which it will be applied). All of this can be expressed with mathematical certainty using trigonometry, though an graphic will communicate the most useful information.

For linking purposes this article's URL is:
http://asecular.com/blog.php?121108 feedback
previous | next |
